
How to Fix the Fake Cloudflare Verification Page Hack on WordPress [ClickFix Attack]

Imagine visiting your own website and seeing a Cloudflare verification screen asking you to prove that you are human. At first, it looks legitimate. But then you notice something strange: the page asks visitors to copy a command, open PowerShell or Terminal, and run it on their computers.
This is not a normal Cloudflare security check. It may be a ClickFix attack, a social engineering technique used to trick people into running malicious commands on their own devices.
For website owners, the problem can be especially confusing. Your website may load normally for you, while other visitors see a fake verification page. A security scanner might report suspicious files, yet removing one file may not explain how the attack started or whether other malicious code remains.
At DigiTrend Marketing Solutions, we investigated a WordPress incident involving a fake verification page, obfuscated JavaScript, suspicious PHP files, and an unfamiliar plugin directory. Removing the suspicious plugin made the fake verification page disappear during initial testing. That was a useful clue, although it did not, by itself, prove that every part of the website was clean.
This guide explains how the fake Cloudflare verification hack works, how to investigate it, and how to clean an affected WordPress website step by step.
Important: The fake verification page is often only the visible symptom. To fix the problem properly, you must identify the code injecting it, remove unauthorized access mechanisms, and check whether the attacker left behind another way to regain access.
What Is the Fake Cloudflare Verification Page Hack?
Cloudflare provides services such as website security, traffic filtering, and bot protection. Its legitimate verification screens can ask visitors to complete a browser check.
Cybercriminals sometimes imitate these screens to make malicious activity appear trustworthy.
A compromised website may display a fake page that resembles a Cloudflare verification challenge. Instead of completing a normal browser check, visitors may be instructed to perform actions such as:
- Copying text or a command from the page.
- Opening Windows PowerShell, Command Prompt, or macOS Terminal.
- Pasting the copied command.
- Pressing Enter to execute it.
These instructions are a major warning sign.
A legitimate browser verification should not require an ordinary visitor to paste and execute an unexplained operating-system command.
What is a ClickFix attack?
ClickFix is a social engineering technique in which an attacker persuades a person to perform an action that appears necessary to solve a problem.
The fake page may claim that the visitor needs to complete a browser verification, fix a connection error, or confirm that their browser is genuine.
The instructions may ultimately cause the visitor to execute malicious code.
Depending on the payload, that code could attempt to steal information, download additional malware, or establish unauthorized access to the visitor’s device.
The important distinction is that the compromised website and the visitor’s computer are two separate security concerns. Cleaning the website stops it from serving the malicious instructions, but it does not automatically clean computers on which visitors may already have executed the commands.
How to Recognize a ClickFix Attack
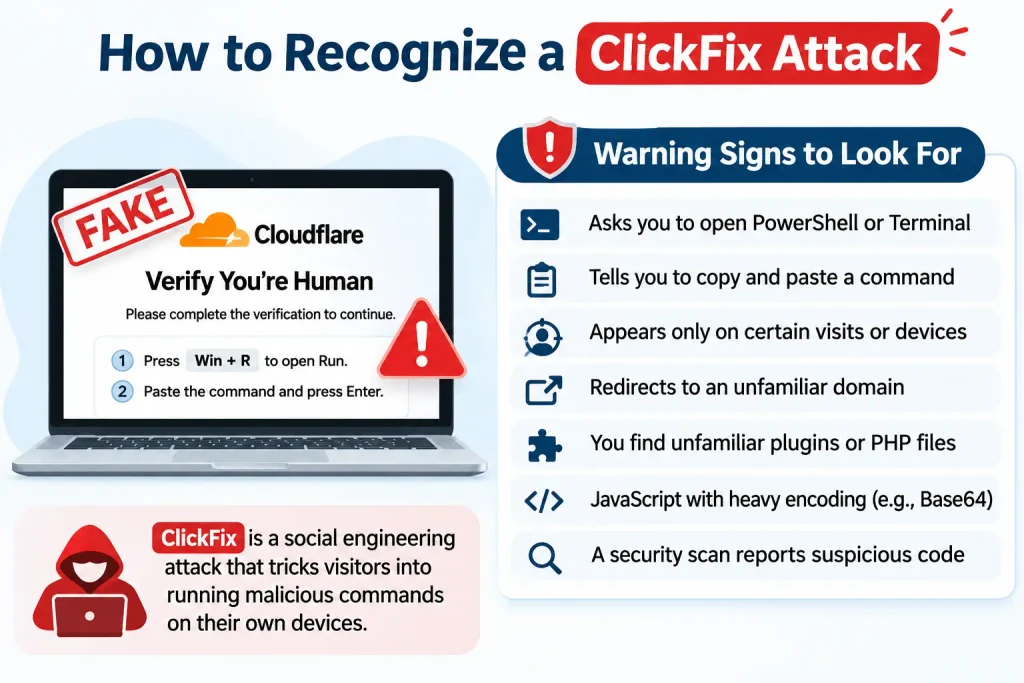
The page may look convincing, so pay attention to what it asks visitors to do.
Warning signs
| Warning sign | Why it matters |
|---|---|
| A verification screen asks visitors to open PowerShell or Terminal | Normal browser verification does not require this |
| Visitors are instructed to copy and paste a command | This is a common ClickFix technique |
| The page appears only on certain visits | Malicious scripts may selectively target visitors |
| The page appears on mobile or desktop inconsistently | Device, browser, or traffic conditions may affect the injected content |
| The page redirects visitors to an unfamiliar domain | The site may be serving unauthorized scripts or redirects |
| You find unfamiliar PHP files or plugins | These may be part of an infection or persistence mechanism |
| JavaScript contains unexplained Base64 decoding or XOR operations | Obfuscation can conceal malicious behavior, although it also has legitimate uses |
| A security scanner identifies unauthorized code | The finding requires investigation against a trusted baseline |
One symptom alone does not establish that a website is infected. For example, Base64 encoding can be used legitimately, and unfamiliar PHP files are not automatically malicious.
The strongest evidence comes from examining what the code does, where it came from, and whether it matches the behavior observed on the website.
Why WordPress Websites Get Infected
WordPress infections can originate from several sources.
Vulnerable plugins and themes
Outdated plugins, themes, and WordPress installations may contain vulnerabilities that attackers can exploit.
An attacker who gains access through a vulnerable component may be able to modify files, inject JavaScript, or install additional code.
Compromised administrator accounts
Weak or reused passwords, stolen credentials, and compromised administrator sessions can allow attackers to make unauthorized changes.
Malicious or compromised plugins
An unfamiliar plugin may have been installed by an attacker, or a legitimate plugin may have been compromised.
Some malicious plugins use ordinary-looking names to avoid attracting attention.
Modified theme files
Attackers sometimes add malicious PHP code to files such as:
- functions.php
- header.php
- footer.php
They may also modify template files or other components that execute when a page loads.
Must-use plugins
Files inside wp-content/mu-plugins/ deserve attention during an investigation.
Must-use plugins are loaded automatically by WordPress and do not behave like ordinary plugins that administrators can simply deactivate from the Plugins screen.
An attacker may use this directory to keep malicious code running even after another suspicious plugin has been removed.
Database injections
Malicious scripts or redirects may be stored in WordPress options, widget settings, page content, or other database records.
Deleting a compromised PHP file will not remove code that has also been inserted into the database.
Compromised hosting credentials
If an attacker obtains hosting panel, FTP, SFTP, or other administrative credentials, they may upload new files even after an initial cleanup.
This is why malware removal should include both file inspection and account security.
Step 1: Confirm the Attack and Protect Visitors
Before changing website files, determine what visitors are experiencing.
Test the website safely
- Open the website in a private or incognito browser window.
- Visit the homepage.
- Visit several internal pages.
- Repeat the test using a different browser or device.
- Record the affected URLs, approximate times, and visible behavior.
If possible, test through a separate internet connection as well. This can help identify behavior that depends on the visitor’s network or location.
Do not execute any command displayed by the suspicious page.
Check whether the issue affects everyone
Some malicious scripts selectively target visitors based on factors such as browser characteristics, cookies, referrer information, or whether the visitor appears to be logged in.
As a result, an administrator may not see the same page as an ordinary visitor.
A successful test from your own browser is not enough to establish that the website is clean.
Protect visitors while investigating
If the attack is ongoing, consider temporarily placing the site in maintenance mode or restricting public access while you investigate.
Keep in mind that a WordPress maintenance plugin may not protect visitors if the malicious code executes before the maintenance page is generated.
Where appropriate, use a hosting-level restriction or another control that prevents the compromised application from serving the malicious content.
Step 2: Back Up the Website Before Cleaning It
Before deleting files or modifying code, create a backup.
A useful backup includes:
- All WordPress files.
- The WordPress database.
- Relevant configuration files.
- Server-level configuration that affects the website.
- Available security logs and scanner reports.
If your hosting provider offers a recent clean backup from before the compromise, preserve it as a possible recovery point.
Why you should keep a copy of suspicious files
Deleting a suspicious file immediately may remove evidence that helps identify the attack.
A backup allows you to inspect the file, compare it with a trusted version, and investigate how it was introduced.
Keep the backup somewhere that cannot be executed by the website. Do not restore suspicious files to the live installation.
A backup of an infected website is useful for investigation, but it is not automatically safe to restore.
Step 3: Find and Remove Suspicious Plugins
Start by reviewing the installed plugins.
In WordPress, open:
Dashboard → Plugins → Installed Plugins
Look for plugins you do not recognize, plugins you did not install, and plugins whose names or descriptions do not match their actual functionality.
Also inspect the plugin directories through your hosting file manager.
For example, a folder named:
wp-content/plugins/wp-helper-c3e064/
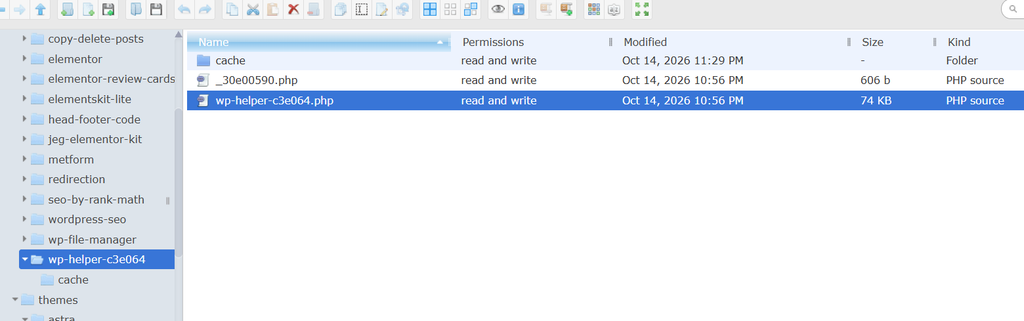
deserves investigation if you did not install it and cannot identify its source.
The name alone is not proof of malware. The PHP code inside the directory is much more useful evidence.
Inspect the plugin’s PHP files
Look for code that:
- Injects scripts into page output.
- Creates unexpected administrator accounts.
- Changes authentication behavior.
- Executes arbitrary PHP or operating-system commands.
- Sends requests to unfamiliar remote servers.
- Downloads and executes additional files.
- Creates hidden scheduled tasks.
- Recreates deleted files.
- Uses unexplained credentials or encoded strings.
Functions such as eval(), base64_decode(), gzinflate(), and shell_exec() may appear in malicious code, but their presence alone is not conclusive. Their use and surrounding logic matter.
For example, Base64 decoding used to process a harmless image or configuration value is different from decoding a hidden JavaScript payload and injecting it into every public page.
Disable or quarantine confirmed malicious plugins
If the code clearly performs unauthorized injection or backdoor behavior, preserve a copy for analysis and prevent it from executing.
If WordPress cannot safely deactivate the plugin, a hosting file manager or SFTP client may be needed.
Do not assume that renaming a plugin directory is a complete cleanup. Other files may load the same code, and a separate backdoor may restore the directory.
A practical example
During an investigation, an unfamiliar plugin directory named wp-helper-c3e064 contained a PHP file that included code associated with the marker <!– _ea_v –> and injected obfuscated JavaScript for visitors without the edit_posts capability.
That behavior matched the fake verification issue being investigated.
After the suspicious plugin was removed, the fake verification page disappeared during initial testing.
This was strong evidence that the plugin was involved in the injection. However, the disappearance alone did not establish that every backdoor or persistence mechanism had been removed.
The lesson: Use the behavior of the code and the observed results to guide cleanup. Do not rely on plugin names alone.
Step 4: Inspect WordPress Core, Theme, and Plugin Files
The next step is to identify unauthorized modifications elsewhere in the installation.
A malicious plugin is not necessarily the only infected component.
Inspect the active theme
Start with the active theme directory, for example:
wp-content/themes/astra/
Review important files such as:
- functions.php
- header.php
- footer.php
- index.php
- Other modified template files
Pay particular attention to unexpected authentication checks, script injection, unfamiliar functions, and code that runs through WordPress hooks.
Check WordPress core files
Review the root directory and the following directories:
- wp-admin/
- wp-includes/
Compare core files against a trusted copy of the exact WordPress version installed on your website.
A checksum comparison or clean replacement from the official WordPress distribution is more reliable than judging a file by its name.
Do not overwrite the entire installation blindly. Preserve wp-config.php, uploads, and other site-specific data, and follow a controlled recovery process.
Inspect modified dates carefully
File timestamps can help establish an investigation timeline.
However, modification dates are not definitive evidence of when a file was created or infected. Restores, migrations, deployments, and automated hosting processes can also change timestamps.
Compare suspicious dates with:
- Hosting access logs.
- Security scanner reports.
- WordPress activity logs, if available.
- Known maintenance or plugin installation events.
Avoid deleting standard WordPress files
Files such as index.php, functions.php, and default.php require context before removal.
A familiar filename does not guarantee that a file is clean, but an unfamiliar filename does not prove that it is malicious.
Compare the code with a trusted source and investigate any unexplained differences.
Step 5: Investigate Suspicious PHP Files in the Website Root
Malicious files do not always live inside a plugin directory.
They may be placed in the WordPress root alongside files such as:
- wp-config.php
- wp-load.php
- wp-settings.php
- index.php
- .htaccess
An attacker may use a convincing filename to make a malicious script look like a normal hosting utility.
What about it-api.php?
During the investigation described in this guide, a file named it-api.php was found in the WordPress root.
Its header identified it as an Installatron Worker, version 1.120, and described it as a temporary website management script.
That description was consistent with a possible hosting management utility, but the header alone could not prove that the file was authentic or unmodified.
This illustrates an important principle: a file that looks suspicious should be investigated, but it should not automatically be classified as malware.
If you find an unfamiliar PHP file:
- Make a backup copy.
- Read its header and surrounding code.
- Identify which component is supposed to create it.
- Compare it with a trusted copy or ask your hosting provider to verify it.
- Determine whether it is currently needed.
- Remove or quarantine it only after you understand its role.
For a temporary management script that is no longer needed, removal may be appropriate once its origin has been checked.
Look for persistence mechanisms
Some malware creates a second file to restore the original payload.
Check for code that writes PHP files, modifies plugins, changes theme templates, or recreates deleted directories.
Also review unexpected PHP files in upload directories and temporary directories.
Do not delete every PHP file found under wp-content/uploads automatically. Some applications legitimately create PHP files in specific locations, but unexpected executable files in upload directories deserve careful review.
Step 6: Check Must-Use Plugins and Other Injection Points
WordPress must-use plugins can be easy to overlook because they do not appear in the standard plugin list in the same way as ordinary plugins.
Open:
wp-content/mu-plugins/
Review every PHP file in that directory.
Look for:
- Unfamiliar function names.
- Unexpected output-buffer manipulation.
- Hooks that inject code into wp_head, wp_footer, or wp_body_open.
- Requests to external servers.
- Hidden authentication logic.
- Code that writes or restores other files.
Example of a suspicious injection pattern
A compromised file might register a function that injects JavaScript into public pages.
Conceptually, the flow could look like this:
- WordPress begins rendering a page.
- A malicious function checks whether the visitor appears to be logged in or has a particular capability.
- If the visitor matches the target conditions, the function outputs an obfuscated script.
- The script constructs or loads another script.
- The visitor sees a fake verification screen.
This is one possible mechanism, not a description of every ClickFix infection.
Why deleting one plugin may not be enough
An attacker may install a must-use plugin that keeps running after an ordinary plugin is removed.
Another file may recreate the deleted plugin, or a database entry may load a separate script.
If the fake verification page returns after removing a suspicious plugin, investigate whether the remaining code is coming from another PHP file, the database, or a cache.
Step 7: Review Header, Footer, and Custom Code
WordPress sites often use plugins to insert analytics scripts, advertising tags, verification meta tags, and other custom code.
These locations should be reviewed during an investigation.
Check:
- Header and footer code plugins.
- Theme customizer settings.
- Page builder custom code settings.
- Widget content.
- Code snippets plugins.
- Google Tag Manager containers.
- Custom scripts added by developers.
Distinguish legitimate tracking code from injected scripts
A typical Google Tag Manager installation loads a script from Google’s official tag manager domain. Google Analytics may also load its gtag.js library.
These are not automatically malicious.
However, a compromised Google Tag Manager container or an unauthorized script inserted beside legitimate tracking code can still cause problems.
Verify that:
- The container ID belongs to your organization.
- The tags in the container are expected.
- No unfamiliar custom HTML tag loads an unknown script.
- No unexpected redirects or browser-verification scripts have been added.
- Your tracking code matches a trusted copy.
Do not delete legitimate analytics code simply because it appears near malicious code in the page source.
Inspect third-party iframe warnings
A hosting security scanner may report that the site contains iframes pointing to external URLs.
An iframe can be legitimate, such as one used for a map, video, or booking widget. It can also be used to load unauthorized content.
Inspect the actual destination URL and determine which plugin, template, or database entry adds the iframe.
The warning alone is not enough to determine whether the iframe is malicious.
Step 8: Inspect the WordPress Database
Removing infected files does not remove malicious content stored in the database.
Depending on the attack, injected code may be stored in:
- The wp_options table.
- Posts and pages.
- Widget settings.
- Custom fields.
- Plugin configuration records.
- Scheduled task data.
The wp_ prefix is only an example. Your installation may use a different table prefix.
Check for suspicious database content
Look for unfamiliar scripts, unexpected external domains, strange redirects, or configuration values that appeared around the time of the infection.
Pay particular attention to recently modified records and settings associated with plugins that you do not recognize.
Be cautious when searching for terms such as base64, eval, or <script>. Legitimate content can contain those strings.
The objective is to identify unauthorized behavior, not to delete every record that matches a keyword.
Review administrator accounts
In the WordPress dashboard, open:
Users → All Users
Check for:
- Administrator accounts you do not recognize.
- Unexpected changes to existing accounts.
- Unfamiliar email addresses.
- Accounts created around the time of the compromise.
Remove unauthorized accounts only after preserving relevant evidence and ensuring that you retain access to a legitimate administrator account.
If you have database access, a qualified administrator can also inspect user roles and capabilities directly.
Review scheduled tasks
WordPress plugins can schedule background tasks using WP-Cron. Malicious code may abuse scheduled tasks to restore files or execute additional operations.
Review unexpected scheduled events, particularly those associated with removed plugins or unknown functions.
Do not delete every scheduled task indiscriminately. Some are required for backups, publishing, email, and other site functions.
Step 9: Clear Caches and Check for Residual Injections
After removing a confirmed malicious injection, clear relevant caches.
Depending on your setup, these may include:
- WordPress caching plugins.
- Hosting-level caches.
- OPcache.
- CDN or reverse-proxy caches.
- Browser caches.
What is OPcache?
OPcache is a PHP performance feature that stores compiled PHP bytecode so PHP scripts can execute more efficiently.
A directory named .opcache or a set of generated folders with hexadecimal names is not automatically evidence of malware.
Its purpose and contents depend on the hosting environment.
Do not delete unfamiliar hosting cache directories solely because their names look random. First confirm what the hosting provider uses them for.
If you suspect PHP OPcache is serving stale code, ask your hosting provider to reset it using the appropriate server-level method.
How to test after clearing caches
- Open a private browser window.
- Visit the homepage.
- Test several internal pages.
- Repeat on another device.
- Inspect the rendered HTML source.
- Search for known indicators from the incident, such as <!– _ea_v –>, if that marker was confirmed in your case.
- Check whether unfamiliar scripts or redirects still appear.
Remember that a page source inspection shows what the browser received. It does not always identify the PHP file or database record that produced the content.
If the malicious marker remains, trace the injection source instead of repeatedly clearing the cache.
Step 10: Reset Credentials and Close Unauthorized Access
Cleaning the visible payload is only one part of remediation.
If the attacker still has access to your hosting account or WordPress installation, they may upload the same malware again.
Reset credentials associated with the website, including:
- WordPress administrator passwords.
- Hosting control panel credentials.
- FTP and SFTP credentials.
- Database credentials.
- API keys or application passwords that may have been exposed.
Use unique passwords that are not shared with other services.
Regenerate WordPress authentication salts
WordPress uses authentication keys and salts in wp-config.php to help secure login cookies.
Regenerating them invalidates existing authentication cookies, requiring users to sign in again.
Obtain fresh values from the official WordPress secret-key service and update the corresponding constants carefully.
Before editing wp-config.php, create a secure backup. Avoid exposing its contents in support tickets or public forums.
Review account access
Check for unfamiliar hosting users, FTP accounts, SSH keys, WordPress application passwords, and connected services.
Remove unauthorized access and ensure that legitimate accounts use appropriate permissions.
If the hosting account itself may have been compromised, ask the provider to review account activity and server access logs.
Step 11: Update WordPress and Run Security Scans
Once the immediate injection is addressed, bring the website’s software up to date.
Update:
- WordPress core.
- Active themes.
- Installed plugins.
- PHP, where supported by your hosting provider and compatible with your site.
Remove unused themes and plugins that are not needed. Inactive plugins can still pose a risk if their files remain accessible or contain exploitable vulnerabilities.
Compare files against trusted versions
For WordPress core, use official distribution files and integrity checks where possible.
For plugins and themes, obtain clean copies from their original developers or trusted repositories.
Do not assume that reinstalling a plugin will remove every separate backdoor or database injection. A compromised installation may contain malicious files outside the plugin’s directory.
Run another security scan
Use your hosting provider’s scanner and, if appropriate, a reputable WordPress security scanner.
Review:
- Malicious files detected.
- Suspicious files detected.
- Files awaiting review.
- Vulnerable plugins and themes.
- Unauthorized changes to core files.
- Unexpected administrator accounts.
A scanner reporting zero malicious files is encouraging, but it does not guarantee that every backdoor or injected database record has been found.
Compare scan results before and after cleanup, and investigate any unresolved findings.
Step 12: Verify That the Attack Has Stopped
Do not declare the website clean just because the fake verification page disappears once.
Use a repeatable verification process.
Website testing checklist
| Test | Expected result |
|---|---|
| Homepage in a private browser | Loads without fake verification |
| Internal pages | No unauthorized redirects or injected screens |
| Desktop browser | No unexpected verification commands |
| Mobile browser | No unexpected verification commands |
| Logged-out visitor | Receives normal website content |
| Page source | No known malicious markers or unexplained injected scripts |
| Hosting security scan | No unresolved confirmed malware |
| WordPress users | No unauthorized administrator accounts |
| Hosting access | No unknown users or credentials |
| Repeated testing | The attack does not return after cache clearing or later visits |
Test both logged-in and logged-out states. Some malicious scripts behave differently depending on the visitor’s permissions.
If the problem returns, record the affected URL, time, and browser behavior. Then inspect the corresponding server response and trace the injected code to its source.
How long should you monitor the website?
Continue checking the site over the following several days, especially after clearing caches and changing credentials.
A short period without symptoms is a good sign, but it is not proof that the infection has been completely removed.
If the attack returns, investigate the possibility of a surviving backdoor, compromised credentials, a malicious scheduled task, or a separate injection source.
Common Mistakes to Avoid
Mistake 1: Deleting files based only on their names
A file named wp-helper-c3e064.php may be suspicious, but its name is not conclusive evidence.
Likewise, a file with a familiar name may have been modified by an attacker.
Inspect the code and verify its origin before deciding what to remove.
Mistake 2: Assuming a clean security scan proves the site is safe
Security scanners can miss obfuscated payloads, new malware variants, database injections, or code that activates only under specific conditions.
Use scanner results alongside manual inspection and behavioral testing.
Mistake 3: Clearing the cache without removing the injection source
Clearing caches may temporarily remove stale output, but it will not fix malicious code that continues generating the page.
Find and remove the source first, then clear caches and retest.
Mistake 4: Removing only the visible malicious script
The JavaScript shown in the browser may be generated by PHP, loaded from another server, or stored in the database.
Removing the visible script from a template may leave the code that recreates it.
Mistake 5: Ignoring credentials
If an attacker still has access to the hosting account, removing one malicious plugin may have little lasting effect.
Rotate exposed credentials and inspect account access as part of remediation.
Mistake 6: Deleting legitimate tracking code
Google Tag Manager and Google Analytics are common on WordPress sites.
Verify their IDs and configuration instead of removing them solely because they appear near suspicious code.
Mistake 7: Assuming the visitor’s computer is safe
If someone executed a command supplied by the fake verification page, their device may require a separate security response.
Website cleanup does not reverse actions already performed on a visitor’s computer.
How to Prevent the Fake Verification Hack in the Future
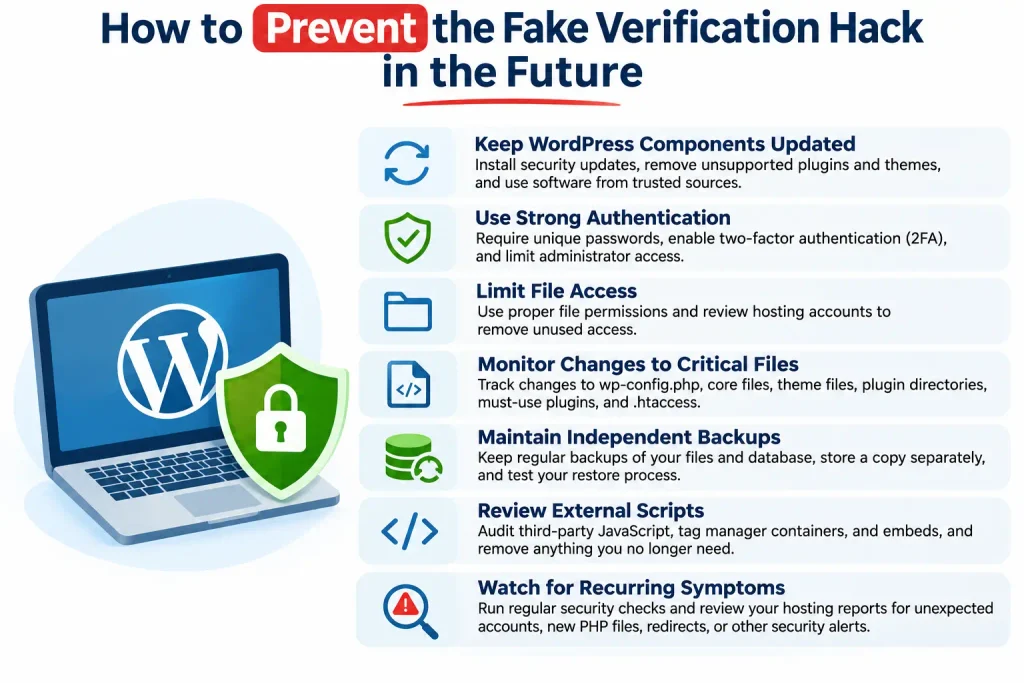
Once your website is clean, reduce the chance of another compromise.
Keep WordPress components updated
Install security updates promptly. Remove abandoned or unsupported plugins and themes.
Choose software from trusted sources and review its maintenance history before installing it.
Use strong authentication
Require unique passwords for administrator accounts and enable multifactor authentication where available.
Limit the number of users with administrator privileges.
Limit file access
Use appropriate file permissions and avoid giving every process unnecessary write access.
Review hosting accounts and remove access that is no longer required.
Monitor changes to critical files
Consider using file integrity monitoring or security alerts for changes to:
- wp-config.php
- WordPress core files.
- Active theme files.
- Plugin directories.
- Must-use plugins.
- .htaccess
Unexpected changes should be investigated promptly.
Maintain independent backups
Keep regular backups of both files and the database.
At least one backup should be stored separately from the live hosting account so that an attacker who compromises the account cannot easily modify or delete every recovery copy.
Test your restoration process periodically.
Review external scripts
Audit third-party JavaScript, tag manager containers, and embedded content.
Remove scripts that are no longer needed and verify the origin of unfamiliar external resources.
Watch for recurring symptoms
Set up regular security checks and monitor reports from your hosting provider.
Investigate unexpected administrator accounts, new PHP files, unfamiliar redirects, and security alerts instead of waiting for visitors to report the problem.
Frequently Asked Questions
Why does my WordPress website show a fake Cloudflare verification page?
Your website may contain unauthorized JavaScript or PHP code that injects a fake verification screen. The code may be inside a compromised plugin, theme file, must-use plugin, or database record. Another possibility is that a third-party script or tag manager configuration has been compromised.
The exact source must be identified before the website can be considered clean.
Is the fake Cloudflare verification page a virus?
The page itself is not necessarily a virus. It may be part of a ClickFix attack that tricks visitors into executing malicious commands on their devices.
Treat any verification page that asks you to open PowerShell or Terminal and execute an unexplained command as dangerous.
Why can I see the website normally while visitors see the fake page?
Some malicious scripts selectively target logged-out visitors or apply conditions based on browser, device, cookies, referrer, or other request characteristics.
This can make the attack difficult to reproduce while logged in as an administrator.
Can deleting a suspicious plugin fix the problem?
Yes, if that plugin contains the code responsible for injecting the fake page. In our investigation, removing a suspicious plugin made the page disappear during initial testing.
However, you should still inspect other files, review database content, clear caches, reset exposed credentials, and monitor the website for recurrence.
Should I delete unfamiliar PHP files from my WordPress root?
Not automatically. First, back up and inspect each file, identify its origin, and compare it with a trusted version where possible.
Some legitimate hosting tools create temporary PHP scripts. Others may be unauthorized. Their behavior and provenance matter more than their names.
Does a clean hosting security scan mean the website is completely clean?
No. A clean scan is encouraging, but scanners may miss certain backdoors, obfuscated code, database injections, or malware that activates only under specific conditions.
Combine automated scanning with file comparison, account reviews, database checks, and live-site testing.
What should I do if the fake verification page returns?
Record the affected URL and time, then inspect the HTML response for known malicious markers or unexpected scripts.
Review recently modified files, must-use plugins, scheduled tasks, database settings, and hosting access logs. If the same code reappears after deletion, investigate what is recreating it.
What if a visitor already ran the command?
Advise the visitor to treat the device as potentially compromised. They should stop following the instructions, avoid entering sensitive credentials on that device, and use a separate trusted device to change important passwords if credential theft is suspected.
They should run an appropriate security scan and seek professional incident-response assistance if the command was executed or suspicious activity follows. Depending on what ran, further remediation may be needed.
Can Cloudflare itself remove the malware from my WordPress website?
Cloudflare services can help filter traffic and protect websites, depending on the configuration and plan. They do not automatically remove malicious PHP files or database injections from your hosting account.
You must clean the compromised website and address the original access method.
How can I tell whether my WordPress site is fully recovered?
No single test guarantees recovery. You should have no confirmed malicious code, no unauthorized administrator accounts, no unresolved security findings, and no unexplained injected scripts or redirects.
Continue monitoring after cleanup, and investigate any recurrence immediately.
Final Thoughts
The fake Cloudflare verification page hack is more than a display problem. It can be the visible result of unauthorized code running on a compromised WordPress website, and it may put visitors at risk through a ClickFix attack.
The most effective response is to identify the code responsible for the injection, remove confirmed malicious components, investigate other possible persistence mechanisms, secure hosting and WordPress credentials, and verify the result through repeated testing.
In our investigation, removing a suspicious plugin caused the fake verification page to disappear during initial testing. That result helped narrow the search, but it was only one part of the cleanup process.
If your website is showing a fake verification screen, do not ask visitors to complete it, and never execute commands displayed by the page. Preserve evidence, investigate the source, and secure the website before returning it to normal operation.
Need help investigating a WordPress security issue?
DigiTrend Marketing Solutions helps website owners investigate technical SEO problems, suspicious website behavior, and issues that can affect site accessibility and search performance. If your WordPress website is showing unexpected redirects, injected scripts, or fake verification pages, a structured investigation can help identify the source and guide the recovery process.
Visit DigiTrend Marketing Solutions to learn more about our website and digital marketing services.

